


Good morning everyone! As I promised yesterday Suzann has a treat for you all today. When I asked you all what you wanted to see here... someone suggested heat embossing inspiration. Like I have said before... Ask and ye shall receive! So I am going to turn you over to her!
Hi Everyone~
Suzann here, I am so glad to share one of my favorite techniques with you. I have created my fair share of heat embossed cards. Everything from spider webs to Christmas trees. I love how the embossed look gives a "raised" feel to any image!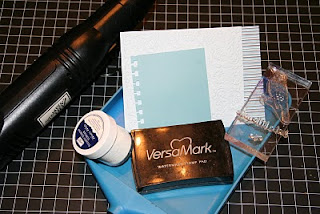
Step 1: Gather Supplies
-Versamark ink pad
-embossing powder (I am using SU white)-Heat Gun
-Card base (I used the paisley cuttlebug folder to decorate)
-stamp image (I am using Technique Tuesday)
-Tray

* a little tip here: if you rub a pinch of cornstarch on your paper before you stamp the image your image will
be more detailed*
Ink the image with the versamark generously.
(because it is clear it was hard to photograph- you can hold the image up to the light and see a shiny image)

The tray is optional but will make cleanup a lot easier.
Also be sure to apply the powder heavily. It will not take much but it is better to cover the image completely.
Be sure to gently tap the paper to knock off the excess powder.


Step 4: Heat
Use a back and forth motionThis will prevent you from burning yourself or starting a small fire~ giggle :)

Here the image is partially heated, note that the image will begin to change colors.

Finished Project! Just added some ribbon and a bow~
I hope that this tutorial will inspire some awesome projects! Happy Scrappin!
~Suzann~
Thanx Suzann for the great heat embossing tutorial. If you guys enjoyed this tutorial let Suzann know by leaving some love for her... you never know... If we get enough comments... maybe we could talk her into doing another tutorial! :op
Scrap Crazy Everyone and have a Great Tuesday!


great tute...I am not a stamper at all though...I bought a heat gun, some clearn embossing ink and UTEE so I could use it on flowers or paper, but I haven't quite gotten the hang of it...the heat gun gets alot of use though to help me heat set fabric paint when I make t-shirts with my cricut
ReplyDeleteBeautiful card and great tutorial! That corn starch tip is wonderful! I'd never heard that, and can't wait to try! Thanks so much!
ReplyDeleteI am so glad that you ladies like the tutorial! Thanks for the love!
ReplyDeleteThank you for sharing. I have always wanted to try my hand at this but was never really sure of what to do. Thank you for sharing your tips!
ReplyDeleteI love heat embossing! Great project
ReplyDeletegreat job on your tutorial. I may have to start collecting the things need to do this.
ReplyDeleteThanks for showing me how.
Thank you for this easy to follow tutorial. I have all of the supplies since I'm a supply freak, but I never really know how to use the stuff I buy. Now thanks to you I can finally do heat embossing. I like the cornstarch tip.
ReplyDeleteMary Ann
I have been hand embossing for years and just got introduced to the entire world of Cuttlebug and Sissix embossing plates. I've died and gone to heaven. I'm new to stamping and I can't wait to try out your tip about the cornstarch! So glad I found your blog! I'm hooked!
ReplyDelete